
在centos 6.2,python2.7 下安装QT 4.8.3,pyqt 4.9.5 详细步骤
By:Roy.LiuLast updated:2012-11-22
在linux 下开发桌面应用,最常见的开发工具就是QT,而python是开源世界的轻骑兵,学习简单,开发高效,因此有了 pyqt 这个包用 python 来做 QT 开发。下面详细介绍其步骤。
一、基础环境配置
二、在centos 下编译,安装QT-4.8.3
三、安装pyqt
四、测试
基本环境搭建
g++ 是必须安装的.
yum -y install gcc automake autoconf libtool make
yum install gcc-c++
在安装QT 之前,还有可能要执行如下的命令,安装需要的依赖包
yum install libX*
1. 安装python2.7 (可以参考 http://www.yihaomen.com/article/linux/284.htm 这篇文章)
2. 更改python 软连接,因为centos 自带的python是 2.6.6 的,不满足需要。
安装PYQT SIP
下载 pyqt sip: http://nchc.dl.sourceforge.net/project/pyqt/sip/sip-4.14.1/sip-4.14.1.tar.gz
解压后 运行:
python configure.py
make
make install
安装PYQT
安装PYQT:http://nchc.dl.sourceforge.net/project/pyqt/PyQt4/PyQt-4.9.5/PyQt-x11-gpl-4.9.5.tar.gz
下载后解压.
你发现,报错了,装不了,提示没有 qmake,
因为没有安装QT,所以,还得安装QT,
下载地址: http://origin.releases.qt-project.org/qt4/source/qt-everywhere-opensource-src-4.8.3.tar.gz
解压之后:
你会发现 QT4.8.3 安装成功,你可以在安装目录/usr/local/Trolltech/Qt-4.8.3/bin/下 运行设计器 designer
然后再重新安装PYqT
在configure 的时候,指定了qmake的路径.
成功之后,然后再
make (要等一段时间)
make install
成功运行命令后,PYQT 安装成功.你可以在python解析器下,运行import PyQt4 来检测是否安装成功.
测试脚本,并运行
所以在centos 下安装qt,pyqt的关键就是,安装的顺序,另外 pyqt sip 也很重要,一定要在安装pyqt前安装,因为这个东西决定安装在那个python下面吧,如果有多个python在机器上。另外就是定qmake 的路径。
一、基础环境配置
二、在centos 下编译,安装QT-4.8.3
三、安装pyqt
四、测试
基本环境搭建
g++ 是必须安装的.
yum -y install gcc automake autoconf libtool make
yum install gcc-c++
在安装QT 之前,还有可能要执行如下的命令,安装需要的依赖包
yum install libX*
1. 安装python2.7 (可以参考 http://www.yihaomen.com/article/linux/284.htm 这篇文章)
2. 更改python 软连接,因为centos 自带的python是 2.6.6 的,不满足需要。
cd /usr/bin
rm -rf python
ln -s /usr/local/bin/python2.7 python
这样做了之后,可能导致一个问题yum 命令不能用,这时需要修改yum
vi /usr/bin/yum
修改第一行的python路径 #!/usr/bin/python2.6 因为centos 是用的python2.6
安装PYQT SIP
下载 pyqt sip: http://nchc.dl.sourceforge.net/project/pyqt/sip/sip-4.14.1/sip-4.14.1.tar.gz
解压后 运行:
python configure.py
make
make install
安装PYQT
安装PYQT:http://nchc.dl.sourceforge.net/project/pyqt/PyQt4/PyQt-4.9.5/PyQt-x11-gpl-4.9.5.tar.gz
下载后解压.
[root@localhost PyQt-x11-gpl-4.9.5]# python configure.py
[root@localhost PyQt-x11-gpl-4.9.5]# python configure.py
Error: Make sure you have a working Qt qmake on your PATH or use the -q
argument to explicitly specify a working Qt qmake.
你发现,报错了,装不了,提示没有 qmake,
因为没有安装QT,所以,还得安装QT,
下载地址: http://origin.releases.qt-project.org/qt4/source/qt-everywhere-opensource-src-4.8.3.tar.gz
解压之后:
./configure (大约要10分钟)
结果如下:
Qt is now configured for building. Just run 'gmake'.
Once everything is built, you must run 'gmake install'.
Qt will be installed into /usr/local/Trolltech/Qt-4.8.3

make  (要等很久)
make install (要等10分钟左右)
你会发现 QT4.8.3 安装成功,你可以在安装目录/usr/local/Trolltech/Qt-4.8.3/bin/下 运行设计器 designer
然后再重新安装PYqT
[root@localhost PyQt-x11-gpl-4.9.5]# python configure.py -q /usr/local/Trolltech/Qt-4.8.3/bin/qmake
Determining the layout of your Qt installation...
This is the GPL version of PyQt 4.9.5 (licensed under the GNU General Public
License) for Python 2.7.3 on linux2.

Type '2' to view the GPL v2 license.
Type '3' to view the GPL v3 license.
Type 'yes' to accept the terms of the license.
Type 'no' to decline the terms of the license.

Do you accept the terms of the license? yes
在configure 的时候,指定了qmake的路径.
成功之后,然后再
make (要等一段时间)
make install
成功运行命令后,PYQT 安装成功.你可以在python解析器下,运行import PyQt4 来检测是否安装成功.
测试脚本,并运行
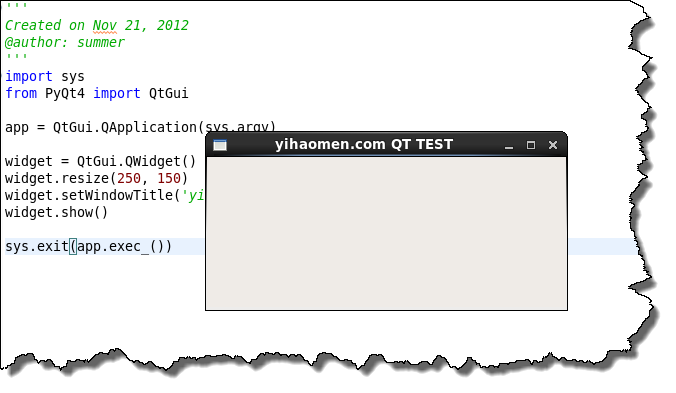
import sys
from PyQt4 import QtGui
app = QtGui.QApplication(sys.argv)
widget = QtGui.QWidget()
widget.resize(250, 150)
widget.setWindowTitle('yihaomen.com QT TEST')
widget.show()
sys.exit(app.exec_())
所以在centos 下安装qt,pyqt的关键就是,安装的顺序,另外 pyqt sip 也很重要,一定要在安装pyqt前安装,因为这个东西决定安装在那个python下面吧,如果有多个python在机器上。另外就是定qmake 的路径。
From:一号门
Previous:java 对map或hashmap排序的两种方法
Next:java 数组排序的简单方法
COMMENTS